
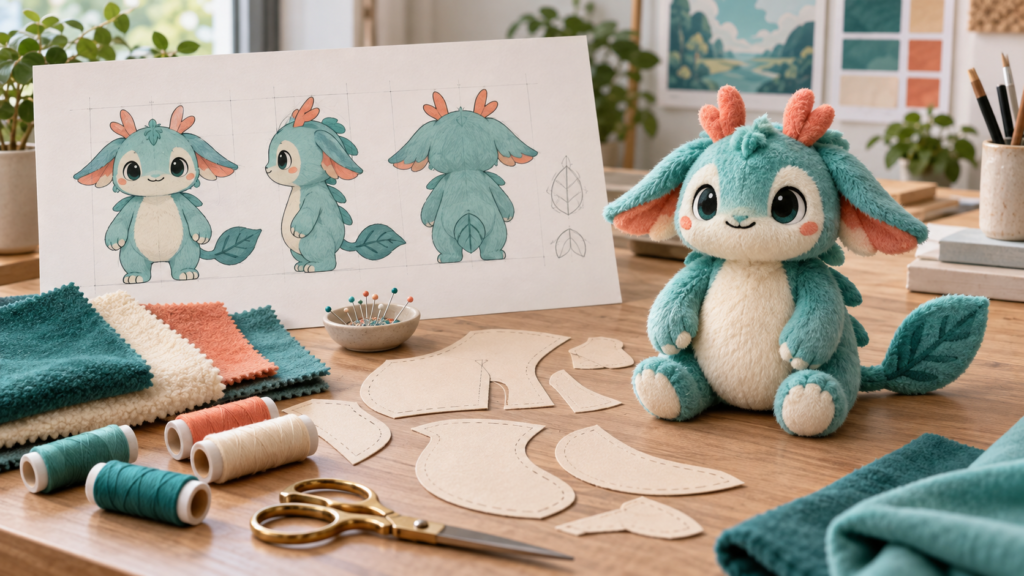
A character can look convincing on a screen and still be difficult to reproduce in fabric. A narrow neck may not support an oversized head. Tiny eyes may disappear in long pile. A dramatic pose may require construction that changes the character’s silhouette. Turning your character design into a custom plush toy starts with deciding what makes that character recognizable, then translating those features into a shape that can be cut, sewn, filled, and reproduced consistently.
This guide focuses on the decisions a brand, illustrator, or retailer should make before approving a sample. For an overview of the wider sourcing process, see our custom plush toys guide for brands and retailers.
1. Define the product before refining the artwork
Write a short product brief before requesting a quotation. Is the character intended as a shelf collectible, a promotional giveaway, a keychain, or a soft toy for children? The intended user and use affect the size, materials, attachments, packaging, and evaluation needed. Do not assume that calling something a collectible removes the need to assess its actual intended and foreseeable use.
Choose a target size and state how it should be measured. A seated character might be measured from the base to the top of its head, with ears measured separately. If one supplier includes the ears and another does not, their quotations and samples may describe quite different products despite using the same number.
- Define the intended audience and destination markets.
- Specify the pose, measurement points, and approximate dimensions.
- Provide an expected order quantity and packaging preference.
- Identify the essential character features and the details that can change.
- State whether the product needs to sit, hang, or stand without support.
2. Prepare a clear character reference sheet
A front illustration alone leaves the back of the head, body depth, tail attachment, and side profile open to interpretation. Provide front, side, and rear views whenever possible. Keep the proportions consistent across those views. A simple, well-labeled drawing is often more useful than a polished illustration with contradictory details.
Mark the eye spacing, mouth position, ear shape, and relationship between the head and body. Add close-up references for distinctive markings. Separate construction notes from decorative artwork so a pattern maker can tell whether a line represents a seam, a printed mark, or simply shading in the illustration.
Provide color references, but treat screen colors as a starting point. The appearance of a fabric changes with its texture, pile direction, and lighting. Request physical swatches for important colors before approving the final material. Keep artwork files organized by version and clearly identify the version authorized for sampling.
3. Decide which features must survive the translation
Choose three or four visual features that carry the character’s identity. These might be a wide forehead, asymmetrical ears, a particular smile, or a contrasting belly patch. Protect those features during development. Smaller details can often be simplified without losing recognition, while a small change to the face can make the toy feel like a different character.
For example, imagine a fox character with a large triangular head, thin legs, and tiny embroidered freckles. At a small plush size, the legs may need more width to allow practical sewing and filling. The freckles may need fewer dots or different spacing. The head shape and eye placement may matter much more than matching every drawn line.
Ask for proposed changes with reasons. A useful response explains the construction problem and shows a workable alternative. Keep a record of approved compromises so they do not become recurring disagreements during later sample rounds.
4. Translate the drawing into sewable panels
A plush pattern divides the character into fabric pieces that form a three-dimensional volume when joined. Seam placement influences the shape of the cheeks, belly, paws, and head. The same front silhouette can produce a flat cushion-like toy or a rounded character depending on the side and gusset panels.
Discuss how the toy should look from several angles, not just from the front. Ask where seams will pass through the face and how attached parts will be secured. A seam that crosses a key facial feature may need a different panel layout. Very narrow sections and sharp corners deserve attention because they can be difficult to turn and fill neatly.
Standing balance also needs practical evaluation. A drawing does not establish that a soft toy will stand unsupported. If that behavior matters, include it in the brief and check the physical sample on a suitable flat surface.
5. Select fabric and decoration together
Fabric and decoration should be evaluated as a combination. Long pile can soften a character’s outline but obscure small facial details. Shorter pile can make embroidery easier to read while creating a different tactile impression. Stretch, backing, and pile direction also affect how a sewn shape looks after filling.
Embroidery works well for many eyes, mouths, and simple markings, but very fine artwork may need adjustment. Printed fabric can reproduce some detailed graphics, while appliqué can create distinct color areas. Request a sample of the proposed treatment on the actual fabric rather than approving a technique based only on a digital mockup.
Ask how the filling distribution will be controlled. The amount and placement of filling affect firmness, symmetry, and the character’s expression. Describe the desired feel in practical terms, such as a firmer head with a softer body, and confirm it on a physical sample.
6. Review safety and rights before committing
Confirm that you own the character or have permission to manufacture and sell products based on it. If an illustrator, agency, or licensor is involved, settle the scope of the rights before production. Keep the approved artwork and authorization available to the parties who need them.
Identify the intended markets and age group early, then obtain qualified advice on the applicable product requirements and testing plan. Avoid assuming that one test report covers a different fabric, accessory, or product configuration. Ask what specific sample a report describes and whether it matches the proposed production version.
Removable accessories, hanging loops, hard components, and decorative attachments should be considered during design review. Addressing a concern before pattern approval is usually more straightforward than redesigning a finished order. This article is a development checklist, not a product compliance determination.
7. Review the first sample systematically
Compare the sample against the brief using a consistent checklist. Start with the silhouette and proportions, then inspect the face, colors, seams, attachments, and feel. Request front, side, rear, and close-up photographs, with a ruler where dimensions matter. Photographs help organize feedback, but they cannot fully show texture, firmness, or balance.
Use numbered comments on annotated images. Replace “make it cuter” with an instruction such as “move the eyes closer together while keeping the mouth centered.” Specify which features are acceptable so that correcting one issue does not unintentionally change another.
Group feedback into essential corrections and optional preferences. Send one consolidated revision list for each round. If several team members approve the design, appoint one person to reconcile their comments before sending instructions to the supplier.
8. Approve a production reference, not just a photograph
Before production, agree on the reference sample and written specification that the order should follow. Confirm dimensions, fabric codes or approved swatches, decoration, filling, labels, accessories, and packaging. Record permitted variations where appropriate rather than relying on vague descriptions such as “same as sample.”
Clarify what is included in the quotation: sample development, revision rounds, packaging, testing arrangements, and shipment terms can be handled differently. Ask how changes after approval affect the price and schedule. A lower unit quotation is difficult to compare if the included work is different.
Retain an approved sample or an agreed equivalent reference for inspection. If a material or construction changes, review the change before it reaches production. Our guide to choosing a custom plush toy manufacturer covers broader supplier questions to ask during this stage.
Common mistakes to avoid
- Approving only the front view: inspect the profile and back as well.
- Using inconsistent artwork: replace older versions and identify the current reference.
- Leaving size undefined: state measurement points and whether ears or accessories count.
- Changing several requirements informally: update the brief and request written acknowledgement.
- Skipping the physical sample: evaluate the feel and construction before committing to production.
Frequently asked questions
Can a plush toy be developed from one drawing?
One drawing can start a discussion, but missing angles and construction details still need decisions. Add side and rear references, dimensions, and notes about the character’s essential features. Ask the supplier to confirm its interpretation before sampling.
Will the plush look exactly like the digital artwork?
Fabric creates volume, seams, and texture that a flat image does not have. The aim is a recognizable, well-made interpretation. Agree on acceptable changes and evaluate the physical sample rather than expecting every line to transfer unchanged.
How many sample revisions should I expect?
There is no single number that fits every design. Complexity, the completeness of the brief, and changes in direction all matter. Ask what revision work is included and consolidate feedback so each round has a clear purpose.
Should I choose embroidery or printing for the face?
Compare both options on the intended fabric and at the final size. The best choice depends on detail, color areas, texture, and the appearance you want. Small-scale trial pieces can reveal problems before a complete sample is made.
What should I send with my first inquiry?
Send authorized artwork, front and side views if available, target size, quantity, intended audience, destination market, and packaging preferences. List any features that cannot change. This gives the supplier a useful basis for questions and a more clearly scoped quotation.
A practical next step
Create a one-page brief and a separate annotated reference sheet before approaching a supplier. The brief explains the product; the reference sheet explains the character. Keep both updated through sampling. A successful custom plush toy depends on those documents and the approved sample telling the same story.